Tinymce Upload Image After Copy and Paste
Image upload is a mutual characteristic in the WYSIWYG HTML editor. If y'all're using TinyMCE editor in the textarea, the epitome can be hands inserted in the editor. TinyMCE HTML editor provides an easy option to upload and insert images in the editor as Hulk information blazon. Just it takes fourth dimension to return Blob images on the browser. Then, server-side upload always a ameliorate option to insert image in a TinyMCE editor.
TinyMCE editor supports local file picking and paradigm uploading. Simply, to make these features functional you required to do some configuration. Besides, the server-side upload handler is required to upload epitome file to the server. In this tutorial, we will testify yous how to allow the user to upload image in TinyMCE editor using PHP.
This example demonstrates the integration of upload prototype characteristic in TinyMCE using images_upload_handler and PHP upload handler. With this feature, the user tin can upload paradigm from computer and insert in TinyMCE editor. Also, a friendly user-interface (UI) will exist provided to simplify the epitome upload past dropping information technology from the computer.
HTML Lawmaking
Specify an HTML element (myTextarea) to add TinyMCE HTML Editor.
<textarea id = "myTextarea"></textarea>
JavaScript Code
At start, include the JS library of TinyMCE plugin.
<script src="tinymce/tinymce.min.js"></script>
The following configuration options enable the local file picker and epitome upload feature in TinyMCE editor.
-
images_upload_url– Specify a URL for the server-side upload handler. One time this config is defined, an Upload tab will announced in the Epitome Dialog. -
images_upload_handler– This config overrides default upload handler to simulate successful upload. This upload handler part takes three arguments – blobInfo, success, and failure. The success callback returns JSON object with location property.
<script> tinymce.init({ selector: '#myTextarea', plugins: 'image code', toolbar: 'undo redo | paradigm lawmaking', // without images_upload_url set, Upload tab won't show upwardly images_upload_url: 'upload.php', // override default upload handler to simulate successful upload images_upload_handler: function (blobInfo, success, failure) { var xhr, formData; xhr = new XMLHttpRequest(); xhr.withCredentials = false; xhr.open('POST', 'upload.php'); xhr.onload = part() { var json; if (xhr.status ! = 200) { failure('HTTP Mistake: ' + xhr.condition); return; } json = JSON.parse(xhr.responseText); if (!json || typeof json.location ! = 'string') { failure('Invalid JSON: ' + xhr.responseText); render; } success(json.location); }; formData = new FormData(); formData.append('file', blobInfo.hulk(), blobInfo.filename()); xhr.transport(formData); }, }); </script>
PHP Upload Handler (upload.php)
The following code creates a server-side upload handler to upload paradigm file to the server using PHP.
- Check whether the file was uploaded via HTTP Postal service using
is_uploaded_file()function in PHP. - If the origin is set, bank check whether it is valid.
- Verify extension of the file using
pathinfo()function in PHP. - Upload file to the server using
move_uploaded_file()part in PHP. - Respond to the successful upload with JSON. Use a location key to specify the path to the saved image resource.
          <?php
                    // Allowed origins to upload images
                    $accepted_origins          = array(          "http://localhost"          ,          "http://107.161.82.130"          ,          "http://codexworld.com"          );          // Images upload path
                    $imageFolder          =          "images/"          ;          reset          (          $_FILES          );
                    $temp          =          current          (          $_FILES          );
if(          is_uploaded_file          (          $temp          [          'tmp_name'          ])){
    if(isset(          $_SERVER          [          'HTTP_ORIGIN'          ])){
          // Aforementioned-origin requests won't set up an origin. If the origin is set up, it must be valid.
          if(          in_array          (          $_SERVER          [          'HTTP_ORIGIN'          ],          $accepted_origins          )){
          header          (          'Access-Command-Allow-Origin: '          .          $_SERVER          [          'HTTP_ORIGIN'          ]);
        }else{
          header          (          "HTTP/i.ane 403 Origin Denied"          );
            return;
        }
    }          // Sanitize input
          if(          preg_match          (          "/([^\w\s\d\-_~,;:\[\]\(\).])|([\.]{2,})/"          ,          $temp          [          'proper noun'          ])){
          header          (          "HTTP/i.ane 400 Invalid file name."          );
        return;
    }          // Verify extension
          if(!          in_array          (          strtolower          (          pathinfo          (          $temp          [          'name'          ],          PATHINFO_EXTENSION          )), array(          "gif"          ,          "jpg"          ,          "png"          ))){
          header          (          "HTTP/1.1 400 Invalid extension."          );
        return;
    }          // Accept upload if at that place was no origin, or if it is an accepted origin
          $filetowrite          =          $imageFolder          .          $temp          [          'name'          ];
          move_uploaded_file          (          $temp          [          'tmp_name'          ],          $filetowrite          );          // Reply to the successful upload with JSON.
          echo          json_encode          (array(          'location'          =>          $filetowrite          ));
} else {
          // Notify editor that the upload failed
          header          (          "HTTP/1.1 500 Server Fault"          );
}
                    ?>
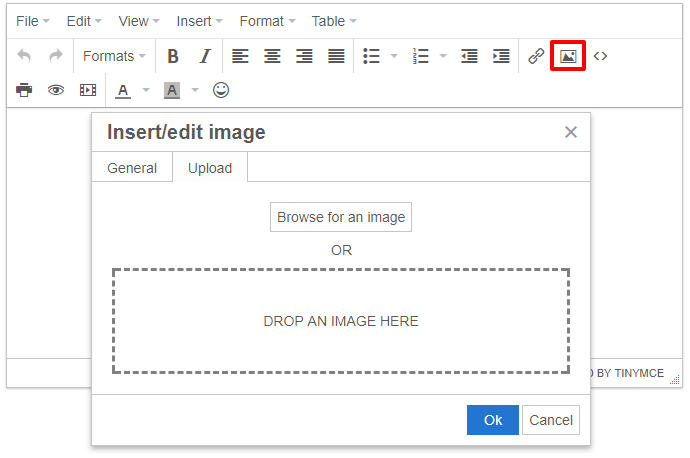
Image Upload Dialog in TinyMCE
The image icon in the editor's toolbar opens a dialog box for the image upload. In the Upload tab, you can select image from reckoner or elevate and driblet the image directly. The image will be uploaded to the server and HTML will exist inserted in the editor.
Boosted Configuration
By default all URLs are automatically converted to relative URLs. If y'all want to insert the real URL of the uploaded image, set convert_urls selection to imitation. Information technology will restore URLs to their original values.
convert_urls: faux
How to Export TinyMCE Content to MS Give-and-take Document
Are yous want to get implementation assistance, or modify or heighten the functionality of this script? Submit Paid Service Request
If y'all have whatever questions about this script, submit it to our QA community - Ask Question
Source: https://www.codexworld.com/tinymce-upload-image-to-server-using-php/
Postar um comentário for "Tinymce Upload Image After Copy and Paste"